Halloween Pumpkin Party & Craft Ideas
The month of October brings with it the official start of the Holiday Season and one of my favorite things in the entire world, decorating! I thought I would share with you some fun, simple and super Spooktacular Home Decorating DIY on the FLY tips using pumpkins. Let the holiday festivities begin!
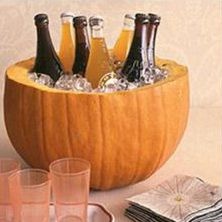
Pumpkins can be used for much more than lighting your doorstep on Halloween. They also make great containers for floral arrangements, food displays and beverages at your next party. Here’s how you put your pumpkin to work to entertain your guests.
Supplies: Large Pumpkin, Plastic Bowl or Vase, Floral Arrangement or Food, Beverages & Ice, Carving Knife, Large Spoon to gut your pumpkin.
Step One: Select your container and a pumpkin that is larger than your container.
Step Two: Cut your pumpkin top off so that it is at least an inch taller than your container. Make sure your pumpkin is also similar in width and height to your container. Next, carve the insides out of your pumpkin with your spoon and place your container inside.
Step Three: Place flowers in the pumpkin with a vase, or food or beverages and ice in the pumpkin with the bowl. Now you are ready to display, dazzle and serve!
If you want to take it a step further, you can always decorate or paint a face on your pumpkin. Have fun creating and serving up pure pumpkin delight to all of your guests!
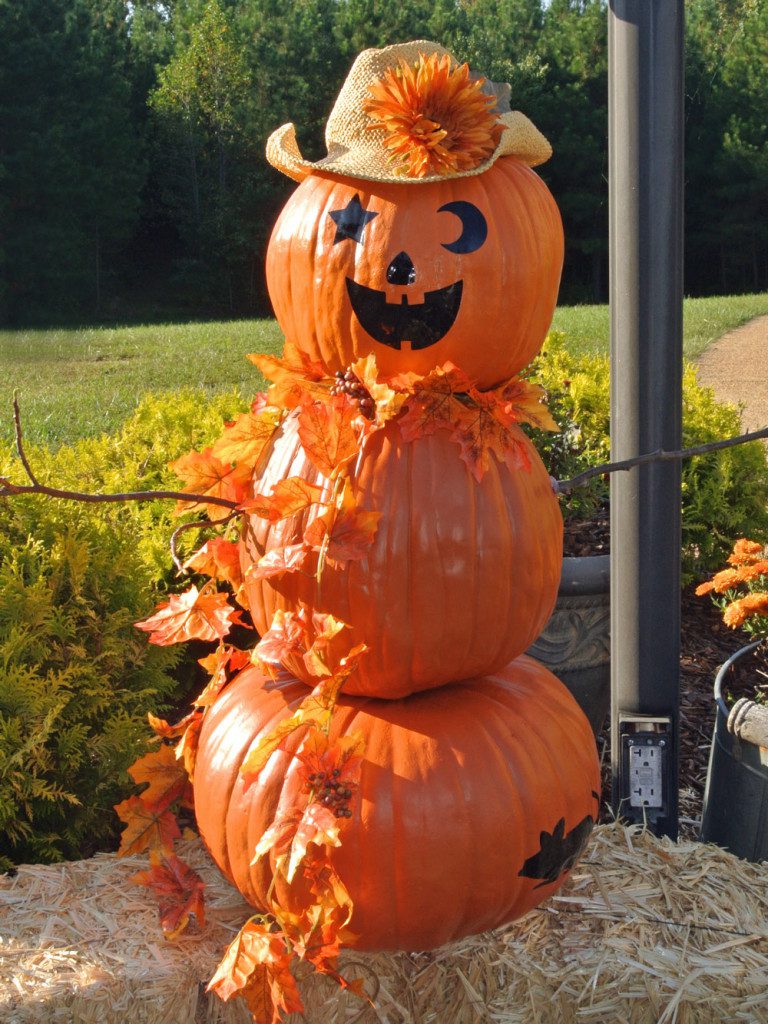
I love to decorate and I love Halloween but personally I have never been into anything to creepy or scary. Here’s a fun way to greet your guests with pumpkins at your doorstep without sending them scurrying away before you have a chance to say hello. Let’s make a friendly pumpkin snowman or scarecrow.
Supplies: Three Pumpkins (Large, Medium, Small), Two Small Broomsticks or Two Branches, Black Acrylic Paint, Hat, Scarf, leaves or raffia to wrap around the neck, Hot Glue Gun (Industrial Strength Glue), Knife or Drill to create holes for the arms
Step One: Glue your pumpkins together with your hot glue gun. Start with your large pumpkin on the bottom, your medium pumpkin in the center and your small pumpkin on top.
Step Two: Use your paint to create two eyes, a nose and a mouth. You can make a snowman, pumpkin or scarecrow face.
Step Three: Creating arms for your pumpkin snowman or scarecrow. Carefully use a knife or drill to make a hole in each side of your middle or medium sized pumpkin to fit your broomstick handles or branches. Put a little hot glue on the end of each broomstick or branch before inserting them into each hole to secure them firmly in place. Tie a scarf, raffia or silk leaves around in the middle of the base of the small and medium size pumpkins to create a neck. Lastly, add a hat on top. You can use a top hat, cowboy hat or any hat that you like. To dress it up a bit more add a plaid shirt or cape to your pumpkin snowman or scarecrow.
Have fun decorating your pumpkin snowman or scarecrow. Don’t be afraid to find your inner Design Diva and add your personal touch to make it your own and reflect your home. I would love to see your pumpkin creations and share them on my social media. Email your photos to me at juleeireland@gmail.com Enjoy this Spooktacular start to your holiday season!